
How to Customize the Magento Contact Form Content & Design
By default Magento includes a built-in contact form with four input fields for the customer's name, e-mail address, (optional) phone number and comments. It's a pretty straightforward contact form that works fine for Magento stores with limited requirements.
What if you'd like to customize the contact form, for example by adding extra form fields? Unfortunately, this cannot be easily done using Magento's Admin Panel. That's probably why customizing the built-in contact form is one of the most frequent requests we have received as Magento developers.
This article will show how you can customize the default contact form by manually adding new input fields in the form's core file, which should be a piece of cake for most web developers.
If you have no or little experience with programming or if you are simply searching for an easy way to customize your Magento contact form, this article will suggest an excellent alternative by using our Custom Contact Forms extension.
Editing the Default Magento Contact Form
This chapter will demonstrate how to add a custom form field to Magento's default contact form. To edit the contact form, open the corresponding form.phtml file of your Magento installation which should be located at app\design\frontend\[yourtheme]\default\template\contacts\form.phtml.
If you're new to this kind of things, it's probably best to make a back-up of the file first before you start editing it.
Manually Inserting New Form Fields
In the following example we'll add a Subject field between the contact form's Telephone and Comment field. Probably the easiest way to do this is by copying the telephone list item from the form.phtml file and paste it directly under its closing tag.
<li>
    <label for="telephone"><?php echo Mage::helper('contacts')->__('Telephone') ?></label>
    <div class="input-box">
        <input name="telephone" id="telephone" title="<?php echo Mage::helper('contacts')->__('Telephone') ?>" value="" class="input-text" type="tel" />
    </div>
</li>
Now simply replace all 'telephone' values with 'subject'. Because the input type of the copied field type="tel" refers to phone numbers it should be changed to type="text", so the Subject field will be recognized as a text input element.
<li>
    <label for="subject"><?php echo Mage::helper('contacts')->__('Subject') ?></label>
    <div class="input-box">
        <input name="subject" id="subject" title="<?php echo Mage::helper('contacts')->__('Subject') ?>" value="" class="input-text" type="text" />
    </div>
</li>
Making Form Fields Required
If you want to make the newly created Subject field a required item and you have no clue on how to do this, you could check how it's done in one of the other required form fields of the default contact form and copy that method.
Looking at the Name list item for example, you will notice that it includes the label class="required" as well as the input class="required-entry", so you'll need to add these classes to the Subject list item as well. Besides that, all required form field are marked with an * on the front-end, which is added by including <em>*</em> in the label tag.
Now your new required Subject list item should look like this:
<li>
    <label for="subject" class="required"><em>*</em><?php echo Mage::helper('contacts')->__('Subject') ?></label>
    <div class="input-box">
        <input name="subject" id="subject" title="<?php echo Mage::helper('contacts')->__('Subject') ?>" value="" class="input-text required-entry" type="text" />
    </div>
</li>
Adding a Input Field Placeholder Text
If you'd like to add a placeholder text or prefilled value to your input field, for example "Enter your subject here", you can do this by adding value="Enter your subject here" to the list item input tag.
<li>
    <label for="subject" class="required"><em>*</em><?php echo Mage::helper('contacts')->__('Subject') ?></label>
    <div class="input-box">
        <input name="subject" id="subject" title="<?php echo Mage::helper('contacts')->__('Subject') ?>" value="Enter your subject here" class="input-text required-entry" type="text" />
    </div>
</li>
After saving the form.phtml file, this is what the default contact form looks like with the addition of a required Subject field:
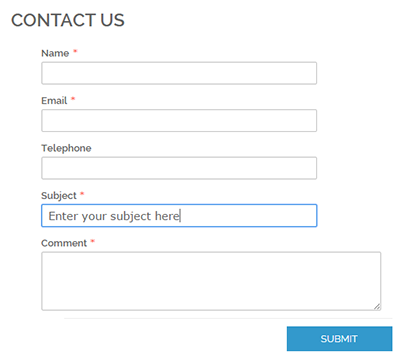
Now that the new form field has been added to the contact form, you will still need to update the transactional e-mail template in order to receive form submissions in your e-mail notifications. Check part 2 of our contact form tutorial if you want to know how to do this.
Creating a Custom Contact Form for Magento
If you would like to make a fully customized Magento contact form using various types of form fields and a completely different front-end style, it can take a lot of time manually editing the core files, especially if you don't have a lot of experience in this field.
This chapter will explain how you can create advanced contact forms directly in the Admin Panel using our Magento Custom Contact Forms extension. This feature-rich extension provides a complete solution for anyone searching for an easy way to create an unlimited amount of custom contact forms and insert them anywhere in their Magento shop.
Its user-friendly drag and drop form builder allows you to quickly build up any kind of contact form choosing from a wide rage of customizable form fields. Besides that the extension includes 18 beautiful front-end themes and dozens of other design and display options to create unique contact forms suitable for every Magento store.
Creating a New Custom Contact Form
After installing the Magento Contact Forms extension, you can create a new contact form by navigating to CMS > Contact Forms > Manage Contact Forms in the top Admin Panel menu.
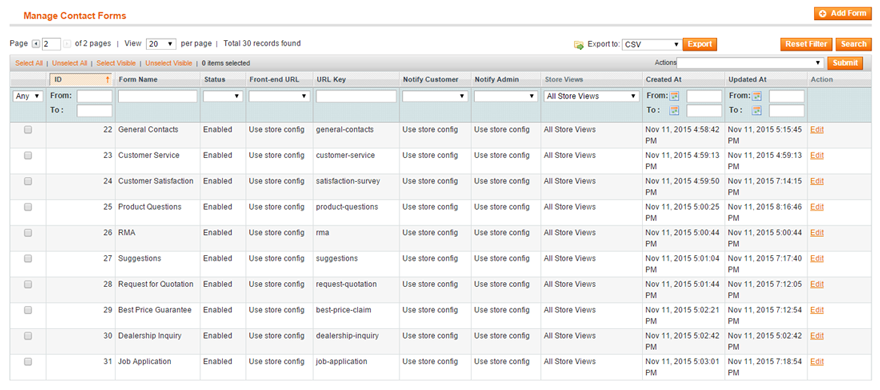
Click the 'Add Form' button in the top right corner of the Contact Forms interface and you'll land in the Form Settings tab.
In this tab you can configure the form's general settings, including the form name and front-end URL settings. Besides that you can also choose to save form submissions in the back-end, allowing you to export submitted form data to CSV or Excel.
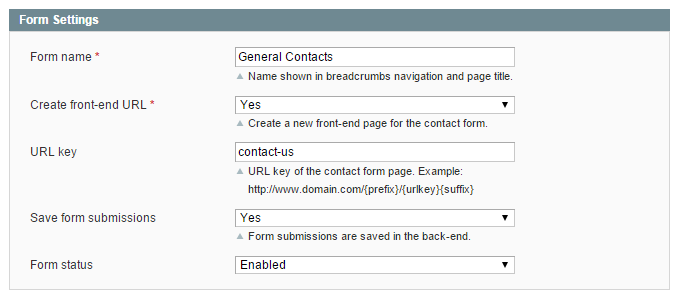
If you choose to automatically create a front-end page for your contact form, you will find the form URL(s) in the bottom section of the Form Settings tab after saving the contact form. Alternatively, the contact form can also be inserted anywhere in your Magento store using the extension's contact form widgets, which is explained in part 3 of our contact form tutorial.

Using the Contact Form Builder
Open the Form Builder tab to start building your custom contact form using the extension's easy drag & drop interface. Simply select the desired form component from one of the five tabs on the right side of the screen and drop it into the Contact Form area on the left.
The selection of form components includes a variety of input fields, radios and check-boxes, a drop-down menu and list box, date and time pickers, a file upload component, buttons and various text elements. On top you can choose between two integrated captcha functionalities to protect your contact forms against spam: the updated Google ReCaptcha and Visual Captcha.
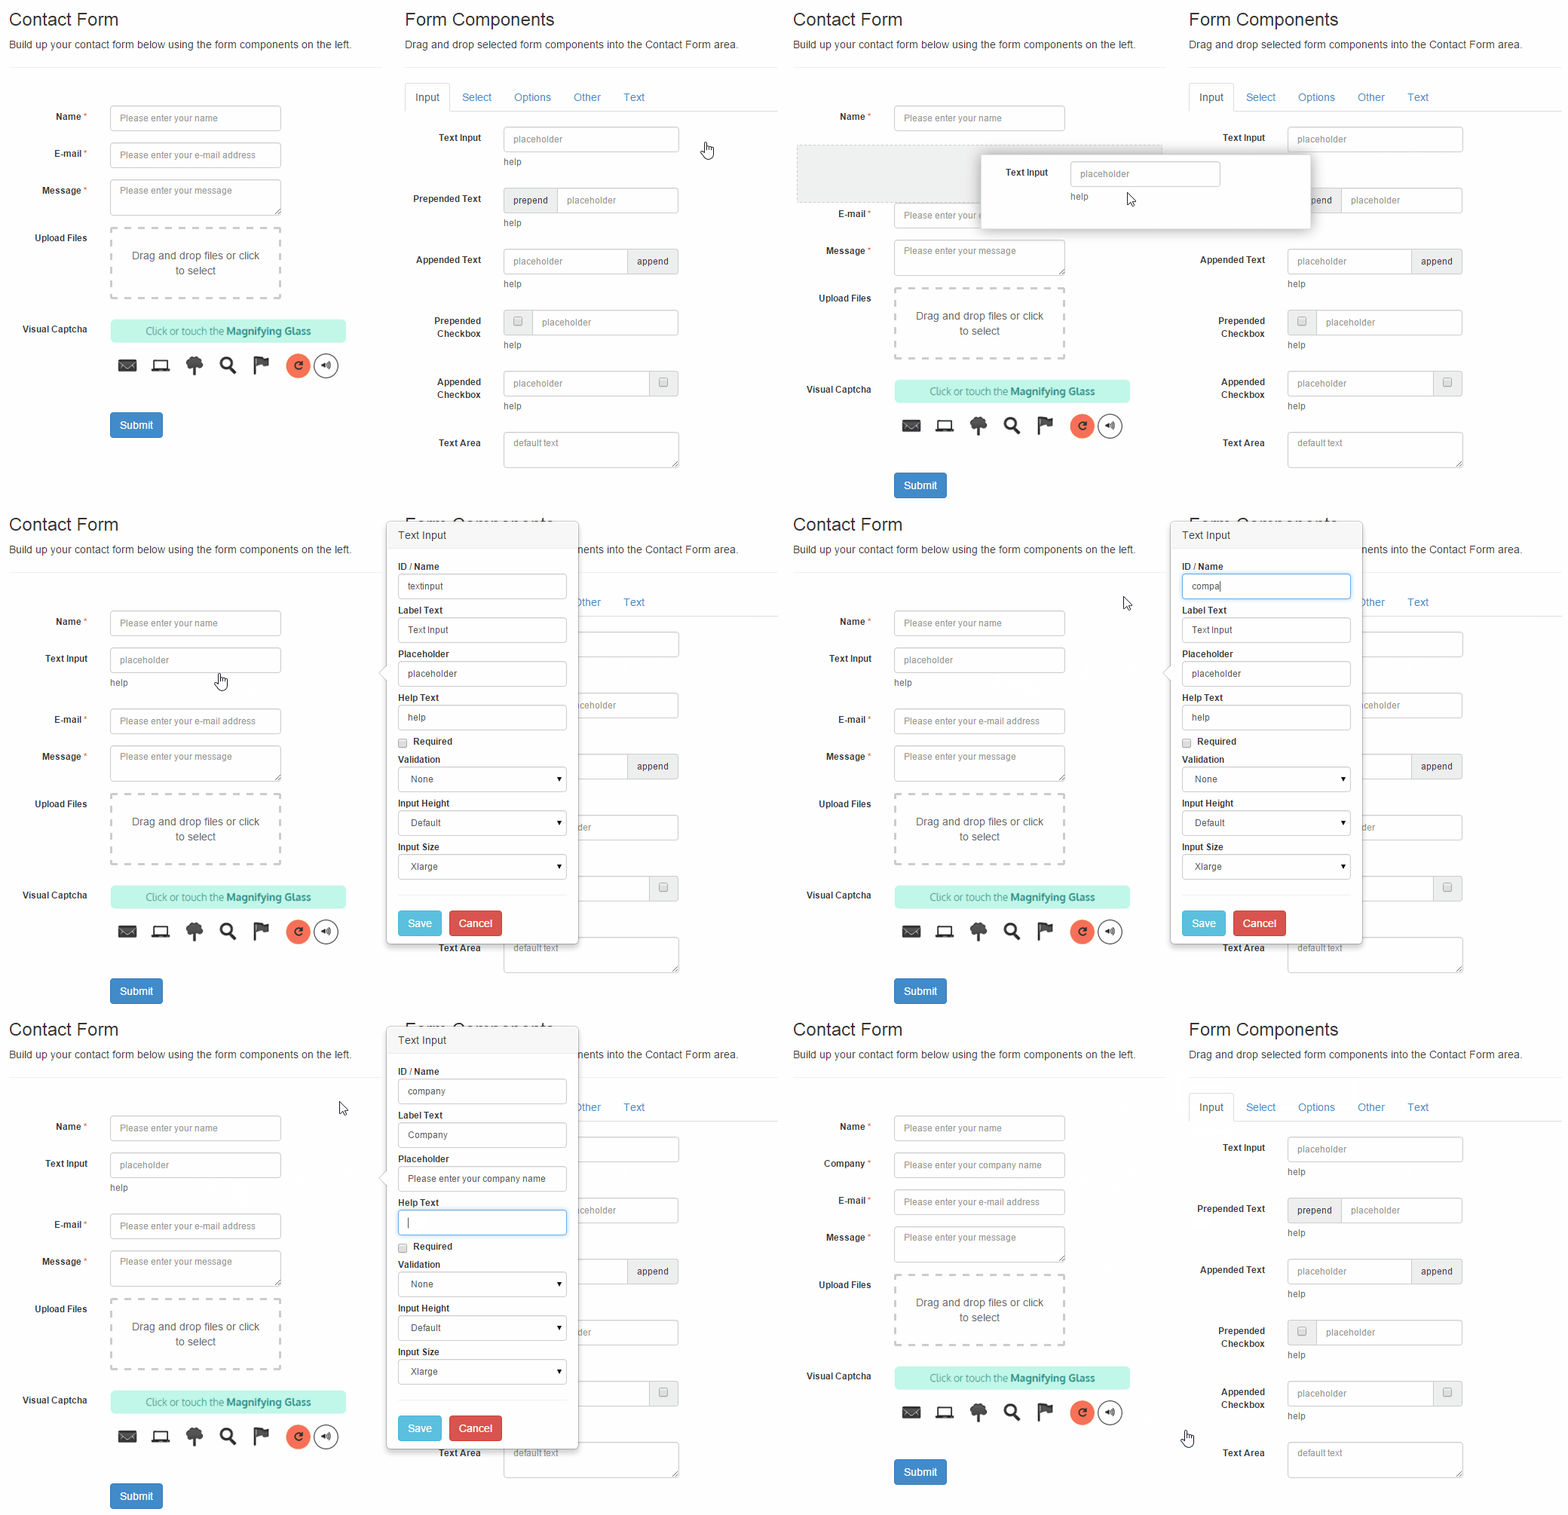
Customizing Form Components
After selecting a form component and dragging and dropping it anywhere in the Contact Form area as exemplified above, you can easily customize the component by clicking it. This will open a pop-over on the right side of the screen showing all configurable values and settings, which vary per form field type.
In order to correctly display the form submissions in the back-end and in the customer/admin e-mail notifications, it's important to assign a unique ID to each form component. We recommend to use a short descriptive value without any spaces, for example 'name' for a Name input field and 'email' for an E-mail address field.
Besides that you can you can customize the form field label, placeholder and help text, change the input height en size and make form fields required with just one button click. With text input fields you can choose from various form validation options such as 'e-mail', 'URL 'numbers' or 'letters only', ensuring your forms are always completed correctly.
Creating Conditional Form Fields
A new addition to our extension enables you to create dynamic contact forms by making certain form fields dependent, meaning that they only appear on the front-end under specified conditions. Check out this blog post to learn more about our extension's conditional form fields feature!
Choosing a Contact Form Front-end Style
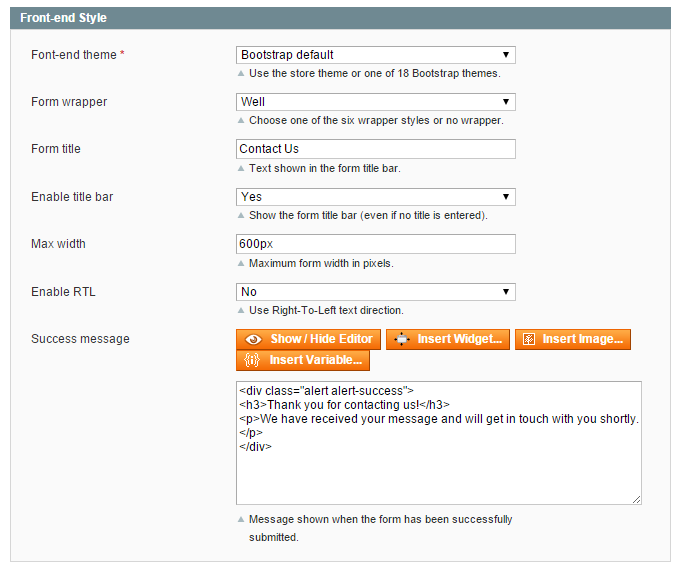
In the Front-end Style tab you can further customize your contact form by choosing one of the 18 integrated Bootstrap-powered front-end themes and six different form wrapper styles. You can also use your own Magento theme if it's built upon Bootstrap.
If you select a form wrapper you can optionally add a title bar to your form and enter the maximum form width. Besides that you can also customize the 'success message' that will appear on the front-end when the form is successfully submitted.
Below are just a few simple examples of contact forms created with our extension. By choosing from the wide range of form components and combining them with one of the beautiful front-end themes, you can easily create any kind of contact form, such as a customer service form, request for quotation form, product question form, RMA form or customer satisfaction form. Read our article about 10 Great Custom Contact Form Examples for Magento for more ideas and inspiration.
Also, be sure to check out the front-end theme showcase in our Magento Custom Contact Forms demo to get an impression of all available styling options!

Summary
This article has shown how you can make simple adjustments to Magento's default contact form by manually inserting and editing a new input element in the core file.
For Magento merchants looking for an easy solution to create various types of contact forms directly in the Admin Panel, our Magento Custom Contact Forms extension provides a fantastic alternative. Besides its simple drag & drop form builder and beautiful design options, the extension comes with many other features such as customizable customer and admin notifications and various front-end display options. Check out our extension page and blog posts below to find out more about these topics, or visit us on Magento Connect!
[…] blog post has talked about customizing the Magento contact form, either by manually adding a new input field to the default form's core file, or by replacing it […]
[…] previous two articles about customizing the Magento contact form talked about changing the form's content and design and setting up e-mail notifications for customers and admin […]
[…] Customizing the Magento contact form, part 1: content & design […]
[…] our first contact form tutorial we have already explained in detail how to create a custom contact form using our Magento […]