
How to Customize the Magento Contact Form E-mail Notifications
In our previous tutorial we have talked about customizing the Magento contact form content and design, either by manually adding a new input field to the default form's core file, or by replacing it with a fully customized form created with our Magento Custom Contact Form extension.
This article will explain how to configure the Magento contact form e-mail notification by creating a new transactional e-mail template or by using our extension's built-in e-mail notification system for customers and admin users.
Creating a Contact Form Transactional E-mail Template
In part 1 of our Magento contact form tutorial we showed how to edit the default contact form by adding a new Subject input field between the Telephone and Comment fields. This doesn't mean the submitted data entered in this field will be automatically included in your e-mail notification: you will need to create a new transactional e-mail template for this.
To create a new e-mail template, navigate to System > Transactional Emails in Magento's top Admin Panel menu and click the 'Add New Template' button.
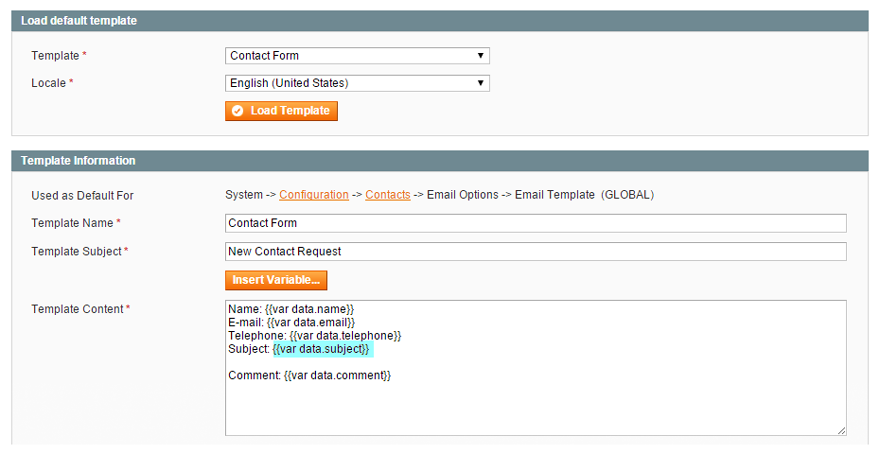
In the top section select 'Contact Form' from the Template drop-down menu and click 'Load Template'. The default contact form e-mail template will be loaded in the Template Information section, where you'll need to enter a template name and subject.
Submitted form data is added to the e-mail notification by inserting variables into the template content for each form field. For example, the variable {{var data.name}} will show the sumitted data of the input field with id="name". In order to include the Subject input field data in the e-mail, you will need to add a new variable in the template content with the form field's ID, which in our example was id="subject".
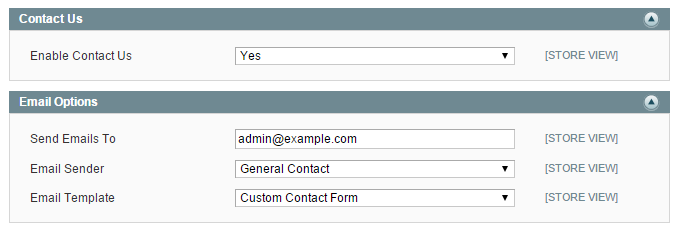
After saving the new transactional e-mail template, you still need to assign it to the store contact by navigating to System > Configuration > Contacts. Select your custom e-mail template in the Email Options section, click 'Save Config' and you should be all set.
Configuring Custom Contact Forms E-mail Notifications
The previous contact form tutorial has explained how you can easily create fully customized contact forms using our Custom Contact Forms extension. Another great feature of our Magento extension is that it comes with a full-fledged e-mail notification system to notify your customers and admin users when a new contact request has been submitted.
You can use the default e-mail notification settings for all your custom contact forms or configure the customer and admin notifications for each form separately as further explained below.
Setting up Customer & Admin E-mail Notifications
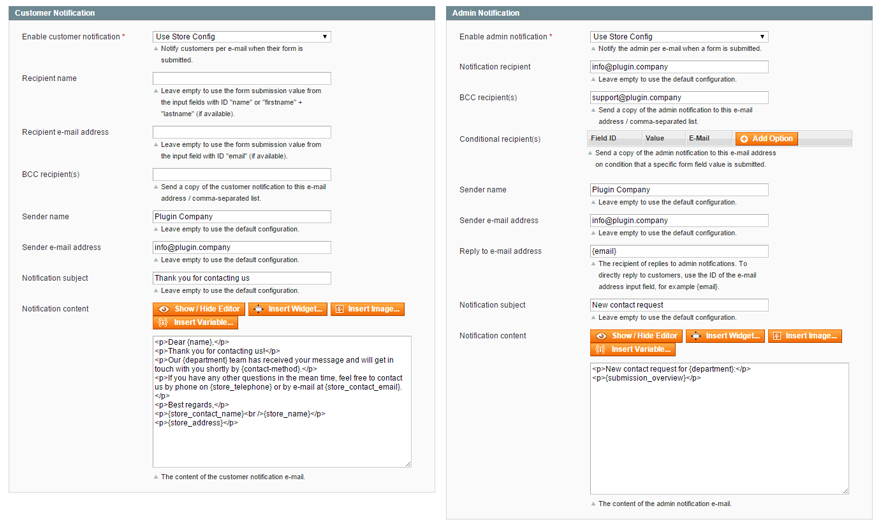
To configure the e-mail notification of a custom contact form, navigate to CMS > Contact Forms > Manage Contact Forms in the top Admin Panel menu. Select an existing form from the overview or click the 'Add Form' button to create a new form. The e-mail notifications can be configured in the Customer Notification and Admin Notification tabs of the Form menu.
For both the customer and admin notification you can configure the recipient and sender details, optional BCC recipients and the notification subject. If you leave these fields empty, the default settings will be used which can be entered in the extension's configuration screen.
The notification content of each contact form can by fully customized at the bottom of the Customer/Admin Notification tab either by using the default content editor or the WYSIWYG editor, allowing you to add widgets, images and variables to your e-mail notifications.
Besides the standard Magento variables, the customer and admin e-mail notification also support the use of custom variables, which we'll talk about in the last chapter.
Configuring Conditional Admin Notification Recipients
A new option added to the Admin Notification tab in Custom Contact Forms v1.4.0 enables you to configure conditional admin notification recipients based on submitted form data. In this way you can send a copy of the admin notification to e-mail addresses on condition that a specific form field value is submitted.
To configure the conditional admin recipients, you need to enter the form field ID and the required value from that form field, followed by the e-mail address that should receive the notification based on the specified value.
In the example below the ID 'department' refers to a 'Question for' drop-down menu including the options Sales, Support and Customer Service. Depending on the department selected from that drop-down menu, the admin notification e-mail will be send to the corresponding e-mail address.

Adding Custom Variables to E-mail Notifications
A handy feature of the Custom Contact Forms e-mail notifications is that all admin fields support the use of custom variables, allowing you to easily add submitted form data to your customer and admin notifications.
When creating a contact form using our form builder, you can configure the content and settings of each form component in a pop-over. The unique ID which needs to be assigned to each form component of your contact form can be used as a custom variable by simply inserting the ID wrapped in brackets in the e-mail notification content.
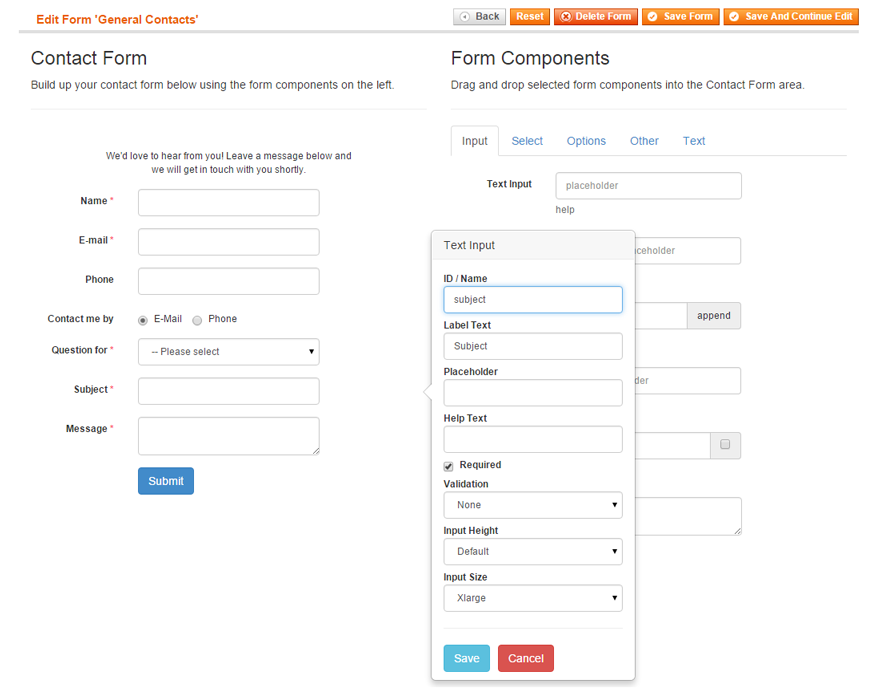
Looking at the example form above, you'll see that the ID 'subject' is assigned to the Subject input field. By inserting {subject} in your e-mail notification content, the submitted form data of this input field will be automatically added to the customer and/or admin e-mail notifications.
In the customer notification below the variable {name} refers to the Name input field, {department} to the Question For drop-down menu and {contact-method} to the Contact Me By radio buttons. If you want to automatically show all submitted form data in your e-mail notification, you can simply use the custom variable {submission_overview}.
The variables starting with 'store' in the example below are standard Magento variables, which can be used to add your default store information to the e-mail notifications.
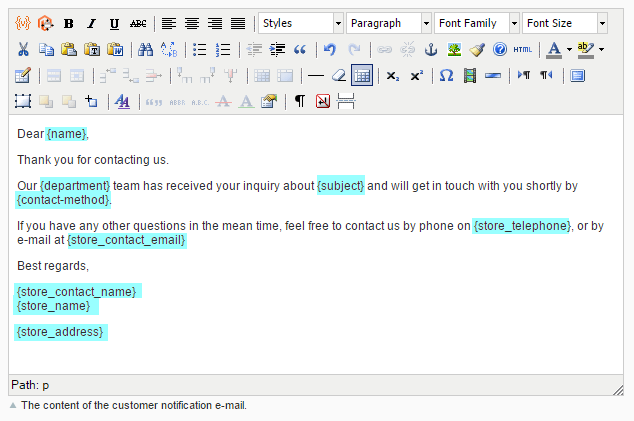
The custom variables can also be used in the other e-mail notification fields. For example, by inserting the variable {email} in the 'Reply to e-mail' field in the Admin Notification tab, admins can directly reply to the customer without having to copy-paste their e-mail address from the e-mail notification first.

Summary
This article has explained how to configure the transactional e-mail template for Magento's default contact form and how to create custom e-mail notifications for customers and admins using our Magento Custom Contact Forms extension.
The benefit of using our extension is that you can fully customize the customer and admin e-mails for each of your contact forms and easily include custom variables in your e-mail notifications, while the options with transactional e-mails are obviously much more limited.
Want to know more about our Magento contact form extension? Check our Custom Contact Forms extension page or visit our Magento Connect page!
[…] about customizing the Magento contact form talked about changing the form's content and design and setting up e-mail notifications for customers and admin […]
[…] e-mail template in order to receive the submitted data in the e-mail notification. Check part 2 of the contact form tutorial if you want to know how to do […]
[…] Customizing the Magento contact form, part 2: e-mail notifications […]
[…] Before saving the contact form, make sure that each form field has a unique ID, which can be entered when configuring the field settings in the form builder. This is not only important for setting up conditional form fields, but also to correctly display contact form submissions in the back-end and in the customer/admin e-mail notifications. […]